Resource Planner
The Resource Planner shows which Resources are available, what Tasks they have scheduled and how much time they have available on any given day. It is used to assign and manage Tasks.
Available from 5.5.0.0
An overview of the Resource Planner and the updates in version 5.5 can be seen in the Scheduling Smarter webinar session video below. Along with the Resource Planner it also covers system set up and the new Task filtering options.
Task Management > Resource Planner
The link will open the Resource Planner window, it is a window that can be filtered to show Resources availability and be used to assign and manage Tasks.
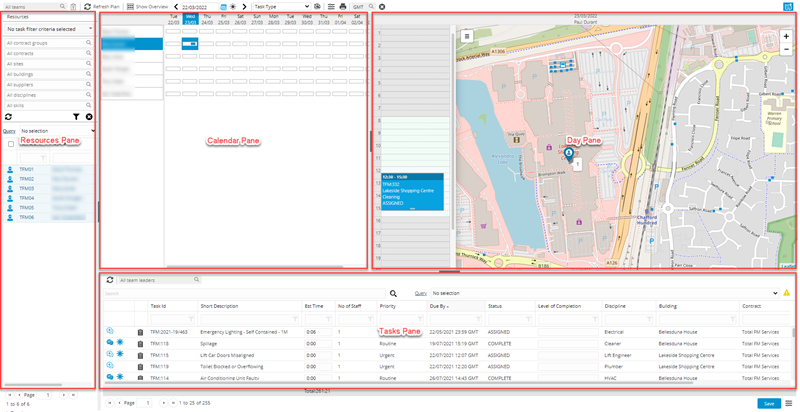
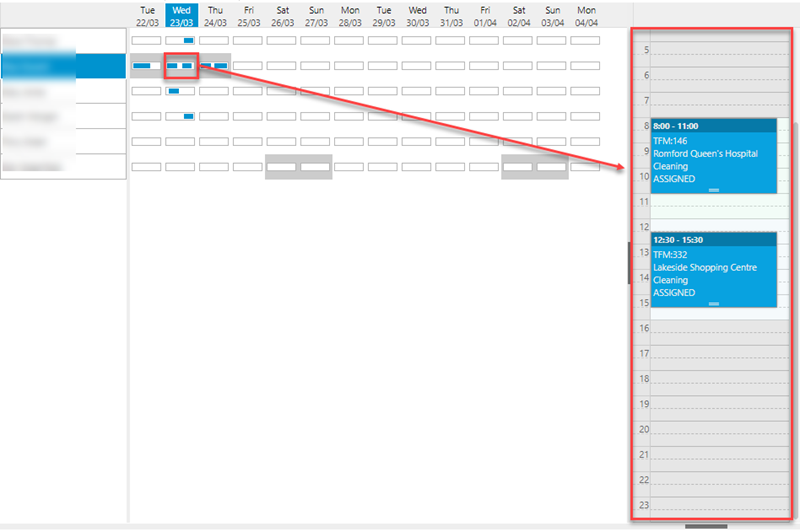
The Resource Planner is made up of four main sections, highlighted in the screen grab below:
The widths and heights of the panes can be adjusted to achieve the best use of the screen space available by dragging the light grey pane dividers to suit the needs of the User. Panes can be collapsed altogether by clicking the darker grey section of the pane dividers. Clicking the dark grey section a second time will re-instate the collapsed pane.
As described in the Scheduling Smarter webinar video above, there are three typical methods to set up Resource availability in MRI Evolution in order to be displayed in the Resource Planner:
- Resources in the system have the same working hours, set up in the Resource Planner Preferences
- Resources are assigned to Rotas, made up of Shifts and Statutory Holidays
- Resources are assigned to Calendars that contain Calendar Days, made up of Calendar Sessions
When the Calendar pane and Day pane are displayed for Resources selected in the Resource pane, the colouration of available hours for work are defined by the three methods above.
Resource Planner Functions

| Icon | Feature | Description |
|---|---|---|
| Teams Filter - 1 |
Available from 5.5.0.0 Moved from the list of Resource filters to the toolbar as part of 5.5.0.0 The Resources shown in the grid of the Resources pane will be filtered by the selected Team Note: When used in tandem with the Filter By Task filter it acts as an additional filter criteria on top of the filter criteria from the Task |
|
|
|
Filter By Task - 2 |
Available from 5.5.0.0 Moved from the list of Resource filters to the toolbar as part of 5.5.0.0 When toggled on :
|
|
|
Refresh Plan - 3 | Refreshes the Calendar pane based upon the Resources selected in the Resources pane |
|
|
Refresh - 4 | Refreshes the Resources grid in the Resources pane based upon the Resource filters employed |
|
|
Toggle Filters - 5 |
Available from 5.5.0.0 When toggled on, the Resource filters section is collapsed allowing for more rows to be displayed in the Resource grid of the Resources pane |
|
|
Clear Filters - 6 | Clears any Resource filter restrictions upon the Resource grid of the Resources pane |
| Query drop down - 7 | Select from a list of Resource based queries to filter Resources displayed in the Resource grid | |
|
|
Select All check box - 8 | When 'Select All' is checked in the Resources Grid, the Calendar pane will refresh automatically to show information from all Resources displayed in the Resource grid according to the current filters applied |
|
|
Show Overview - 9 | Returns the Calendar pane to the Overview mode for the Resources selected in the Resource grid of the Resources pane |
|
|
Scroll Left - 10 | Allows the User to scroll the Calendar pane backwards |
|
|
Date field and Calendar Picker - 11 | Used to set a date to be the focus for the Calendar pane |
|
|
Today - 12 | Takes the User back to today’s date in the Planner. |
|
|
Scroll Right - 13 | Allows the User to scroll the Calendar pane forwards |
| Colouring Set picker - 14 | Used to select a Colouring Set to apply to the items in the Calendar pane | |
|
|
Show Legend - 15 | Opens a popup window showing the Colouring Legend for the Colouring Set currently in use |
|
|
User Preferences - 16 | Allows the User to view or maintain their Resource Planner User Preferences - if changes are made whilst the Resource Planner is open, it must be closed and rebuilt for changes to take effect |
|
|
Report - 17 | Prints the Engineers Diary Agenda (ED-003). |
|
|
Close - 18 | Closes the Resource Planner |
|
|
Show/Hide Map - 19 |
Available from 5.5.0.0 The Map and Route options will only be shown when the user clicks this new Map icon in the header of the Day/Resource column |
|
|
Travel & Route Planning - 20 |
Available from 5.5.0.0 An overlay pane that can be shown or collapsed on demand by the user by clicking the Travel & Route Planning button within the Map view |
Resource Planner panes
Resources pane enables a User to select the Resources they are interested in to display in the Calendar pane,
As described in the Scheduling Smarter webinar video above, there are two main ways to use the Resource Planner, one being the existing method of filtering Resources to display in the Planner, then assigning Tasks to them and the new Task based method.
The Filter By Task toolbar button changes the focus from one to the other:
- Filter By Task option disabled - Resource based:
- selecting a Team in the Teams Filter
- selecting values from the filter drop downs in the upper half of the Resources pane and clicking the
 refresh icon
 - selecting a Query from the drop down
- Filter By Task option enabled - Task based:
- selecting Task(s) in the Tasks grid
- selecting a Team in the Teams Filter
- using the Filter Resources multi-select drop down
- selecting a Query from the drop down
Once the required Resource filters have been applied to return the most appropriate Resource(s) in the Resource grid, highlight the Resource(s) to be displayed in the Calendar pane and click the ![]() Refresh Plan toolbar option
Refresh Plan toolbar option
Filter Resources multi-select dropdown
Users can select as many, or few, of the filter options required to return the most appropriate list of Resources for the Task(s). As more options are selected, more criteria will be applied to the returned list of Resources and vice versa.
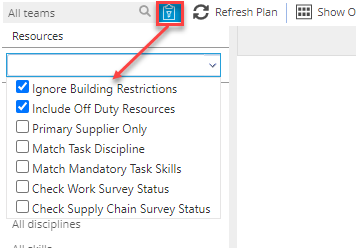
Note: The filter options selected will be stored against the user's system profile and will become their default options in all of the MRI Evolution pages using the multi-select dropdown, until such time as they change the filter options selected.
| Filter Option | Description |
|---|---|
| Ignore Building Restrictions |
When this option is toggled ON it has the effect of ignoring one of the system's baseline filters, the filter that says the Resource must be assigned to work in the Building of the current Task. When this option is toggled OFF, only those Resources assigned to work in the Building of the current Task will be displayed. Note: This filter option is subject to user's granted Permission. |
| Include Off Duty Resources |
This filter option is the same as the existing filter checkbox for 'Show Off Duty Resources'. It should behave in the same way. When this option is toggled ON the Resources marked as off duty will also be displayed. When this option is toggled OFF the Resources marked as off duty will be excluded. Note: This filter option is subject to ISM purchase key |
| Primary Supplier Only |
By default, the Task Assignment pages show Resources that are linked to Suppliers that are Primary or Secondary Suppliers for the Contract of the current Task. When this option is toggled ON, Resources that work for the Secondary Supplier of the Task's Contract are excluded When this option is toggled OFF, Resources that work for the Primary and Secondary Supplier of the Task's Contract are displayed |
| Match Task Discipline |
This filter option is the same as the existing filter checkbox for 'Discipline' but has been renamed. When this option is toggled ON, the list of Resources will only include those that have a Primary or Secondary Discipline that matches the Discipline of the current Task When this option is toggled OFF, the list of Resources will include Resources that don't have a Primary or Secondary Discipline that matches the Discipline of the current Task |
| Match Mandatory Task Skills |
When this option is toggled ON, the list of Resources only include those that have Skills that match the mandatory Skill Requirements of the current Task. In order for the matched mandatory Skill to be considered valid, the following criteria must also be met:
When this option is toggled OFF, the list of Resources include those that have Skills that do not match the mandatory Skill Requirements of the current Task. Note: It is possible to assign Resources to Tasks where the Resource does not meet the Skill Requirement, in a similar way that Building assignments can be bypassed. |
| Check Work Survey Status |
When this option is toggled ON, the list of Resources includes only those that have a valid Survey Response (as defined by the Survey Template) to any Work Survey Templates, linked to the current Task, where the Work Survey Template:
When this option is toggled OFF, the list of Resources is not restricted to only those that have a valid Survey Response to a Work Survey Templates, linked to the current Task.
Note: This filter option is subject to the Surveys purchase key |
| Check Supply Chain Survey Status |
When this option is toggled ON, the list of Resources includes only those that have a valid Survey Response (as defined by the Survey Template) to any Supply Chain Survey Templates, linked to the current Task, where the Supply Chain Survey Template:
When this option is toggled OFF, the list of Resources is not restricted to only those that have a valid Survey Response to a Supply Chain Survey Templates, linked to the current Task.
Note: This filter option is subject to the Surveys purchase key |
Calendar pane enables the diary overview.
It is important to note that the objects displayed in a Resource's diary are Time Records for Tasks, not the Tasks themselves.
Clicking on a date at the top of the pane will show the daily diaries of all Resources selected in the Resources pane, side by side:
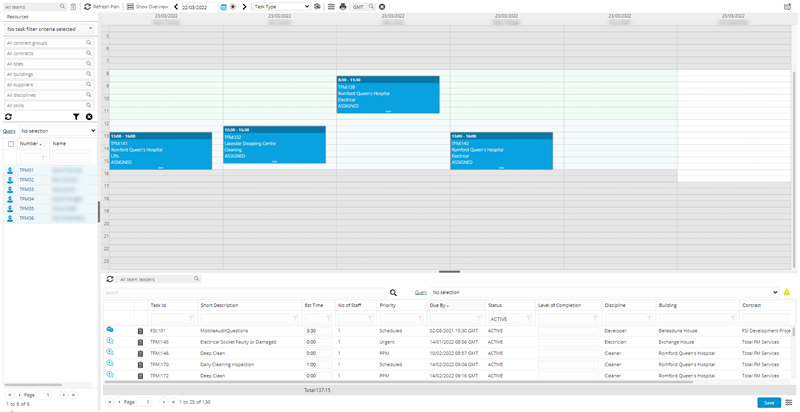
Clicking on a Resource's name will show just that Resource's dairy for the coming days:
Resource's availability is shown as white if they are available and grey if they should not be available. - Rotas, Calendars or Resource Planner Preferences must be in place for this colouration to show.
Resources can be assigned work in greyed out areas as this is purely an indication that the Resource may not be available.
Tasks pane contains a Task grid. It is a grid view which can be searched, sorted and customised as normal.
The first column contains in-line icons for:
- Events
- Requirements
The Events icon and popup panel behaviour is identical to the Events icons implemented in the Timesheets grid.
- Where no Events exist against the Task, this icon
 will be displayed. Clicking the icon will open the Event input panel, allowing an Event to be added directly to the Task
 - Where Event(s) exist against the Task, this icon
 will be displayed. Clicking the icon will open a small popup list, showing summary details of the Events linked to the Task. The Event records can be opened via a hyperlink
The Requirements icon ![]() will only be displayed where the Task has associated Requirements record(s). Clicking the icon will open a small popup list, showing summary details of the Requirements linked to the Task
will only be displayed where the Task has associated Requirements record(s). Clicking the icon will open a small popup list, showing summary details of the Requirements linked to the Task
Tasks can be selected in the grid and by clicking the ![]() Filter By Task toolbar button, the Resources displayed will be filtered to show only those able to be assigned to the Task(s) selected
Filter By Task toolbar button, the Resources displayed will be filtered to show only those able to be assigned to the Task(s) selected
Tasks can be assigned to Resources by dragging them from the Task grid onto an appropriate slot in a Resource's Diary within the Calendar pane or Day pane, if in overview mode.
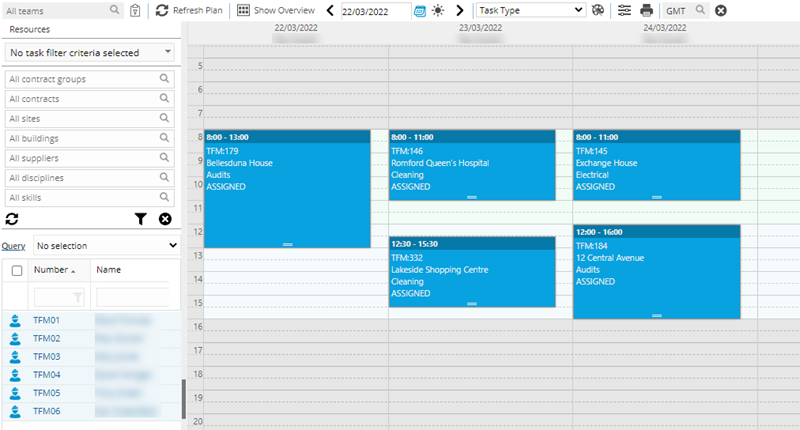
Day pane enables an overview of a Resource's Diary for a single day.
It is important to note that the objects displayed in a Resource's Diary are Time Records for Tasks, not the Tasks themselves.
Only shown in overview mode, click on a day within the Calendar pane to view.
Tasks can be dragged and dropped here from the Tasks pane grid to assign them to the Resource, creating a Task Time Record.
The order and or planned time of the Time Records can be changed by dragging and dropping up and down to achieve the optimum use of the Resource's available time on the day.
Available from 5.5.0.0
A Map View of the Resource's day can be displayed by clicking the Show/Hide Map toolbar button:
- Each Task Time Record allocated to the Resource for the selected Day is shown as a Pin on the map - coloured blue
- Using the OpenRoutePlannerAPI, the map will show the calculated Route between the Task Building positions. Route order is based on the Order that the Task Time Records have been scheduled
- Each Task Time Record Pin will display a number that indicates the position in the route. E.g. the Pin for the earliest Task will have number 1, the Pin for the second Task should have the number 2 and so on
- The Task Time Record Pin should display a context menu when clicked:
- Task ID:
- Building:
- An additional Pin should be placed in the map to show the position of any Task selected in the Task pane at the foot of the Resource Planner - coloured red:
- Pin co-ordinates should be based on the Latitude and Longitude of the Building linked to the selected Task
- If a User reorganises the order of the Time Records in the Day planning pane, the Pin numbers and Route in the map will be recalculated to reflect the changes
- If a new Task is added to the Day Pane, creating a new Task Time Record, a new Task Time Record Pin will be shown in the Map, the Pin numbers and Route will be recalculated to include the new Task Time Record
- Clicking on any of the Time Record objects in the Day pane for the Resource will change focus of the map to show the relevant Pin
- If the Pin for the selected Time Record is off screen, the map control should re-orientate to place it at the centre
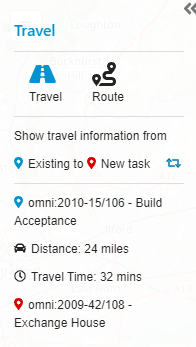
The Map View of the Resource Planner displays Travel and Route Information to Users in an overlay pane that can be shown/collapsed on demand by the user by clicking the Travel & Route Planning button ![]()
Note: In order to use this feature, MRI Evolution gets travel and route information from the OpenRoute service. MRI Evolution must be able to communicate with the OpenRoute service and must also have a valid Registration Key. If MRI Evolution cannot access OpenRoute or does not have a valid Registration Key then you may see the following message: "The system has not been set up to calculate Travel & Route information. Please contact your system administrator".
If you see this message, please contact your system administrator so that they can request a valid key from MRI Software Support and check that communication between MRI Evolution and OpenRoute has been configured correctly.
Note: Depending on your licence there may be restrictions on the number of times users can calculate a route or obtain travel information via OpenRoute. If you have exceeded your daily limit then you will see the following message: "It's not possible to get Travel & Route information at this time. Please contact your system administrator".
When you see this message your only option is try again at a later time. If you continually see this message and it impacts on your use of the system then please contact your system administrator so they can speak to MRI Software about how to increase the number of travel and route calculations you can make each day.
Travel Information
This mode shows the travel information between 2 points:
-
One of these points must be a Task selected in the Tasks Grid pane (red pin on the map)
-
The other Point will be an existing assigned Time Record in the current day view (blue pin on the map)
-
The Time Record will be selected by one of the following methods
-
clicking on a Pin in the map control
-
clicking on a Time Record planning object in the day view pane
-
-
-
When the Travel and Route Information pane is expanded and the Travel option is selected the travel information will be updated automatically on any change to either the Task selected in the Task grid or the selected Time Record (day view or map pin)
Route Information
This mode will show the route information between any Time Record Objects in the day view for the current day
- When the Information pane is expanded and the Route option is selected, the route information should be updated automatically on any change to the order of the Time Records in the Day view Pane
Planner Time Record Right Click Options
Tasks can be assigned by dragging them from the Task grid on the appropriate slot in a Resource's Diary, creating a Task Time Record.
Right clicking on the Time Record once it is in the Planner provides the following options:
- Delete this entry - deletes the diary entry and associated Time Record
- Edit this entry - opens a popup window allowing details of Time Record to be manually altered:
- Start date/time
- End date/time
- Estimated Travel Time
- Status
- Cut - Cut the Time Record out of a Resource's Diary and allow it to be pasted to another Resource's Diary.
- Copy - Copy the Time Record out of a Resource's Diary and allow it to be pasted to another Resource's Diary.
- Lock this entry - Prevents the Task being moved in the diary until it is unlocked.
- Show editing window - opens the Resource's Time Record for the Task.
- Open task window - opens the Advanced Helpdesk.
- Open appointment - Selecting the Open appointment option will open the new Appointment Visit input panel for the Appointment Visit linked to the selected Time Record
- This option is hidden if the Appointments licence key is not present
This option will only be enabled if the selected Time Record is linked to an Appointment Visit
If the Time Record is not linked to an Appointment Visit, the Open appointment option will be disabled and the text appearing a much lighter grey
- Update estimated travel - When this option is pressed the estimated travel time returned by the OpenRouteServiceAPI will be written to the EstimatedTravelTime field of the selected Time Record. The planner object will be refreshed in the Calendar pane to show the update represented by the visible buffer of travel time added
It would not be possible to calculate an estimated travel time in the following scenarios:
There is no Task Time Record prior to the selected Time Record on the same day
If the Task Time Record prior to the selected Time Record on the same day does not have any Building Latitude\Longitude values
- This option is hidden if the Appointments licence key is not present
Adding Notes and Absences
There are times when a Resource's time is taken up with things other than travel or Tasks. These can be documented as Absence or with a Note.
In the Calender view left click and drag to highlight a period of time
Release the mouse button, a pop up window will appear allowing details of the Note or Absence to be entered.