Location Register
In order to ease both Asset tracking and Call Logging, MRI Evolution allows every Location (i.e. Room, corridor, storage cupboard, etc.) to be defined.
Locations can be created within a Building either in the Building Register window, or through the Location Register. If a Location is defined from within the Building Register, the Building field for the new Location is automatically completed on creation.
The list of Locations are maintained here.
Facilities > Property and Estates > Location Register
The link will open the Location Register grid. It is a grid view which can be searched, sorted and customised as normal.
To add a new Location click New ![]() , to edit an existing Location click Edit
, to edit an existing Location click Edit ![]() . A pop up window will appear which will allow the creation or amendment of a Location.
. A pop up window will appear which will allow the creation or amendment of a Location.
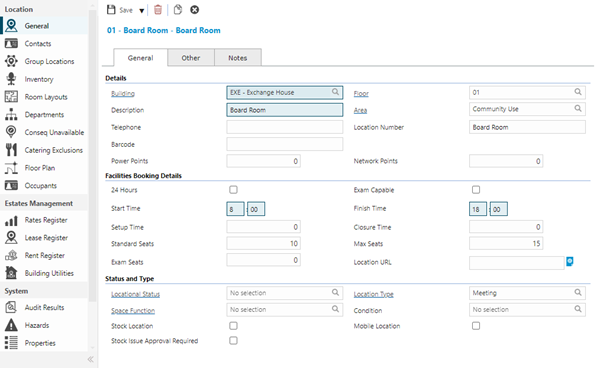
 Click to view - General Tab - Fields and Descriptions
Click to view - Other Tab - Fields and Descriptions
Click to view - Notes Tab - Fields and Descriptions
Complete the fields and click Save ![]() . Once the Location header has been completed and saved a sub navigation will appear to allow additional entities to be assigned / created. These include:
. Once the Location header has been completed and saved a sub navigation will appear to allow additional entities to be assigned / created. These include:
- Contacts
- Group Locations
- Inventory
- Room Layouts
- Departments
- Conseq Unavailable
- Catering Exclusions
- Floor Plan
- Occupants Available from 6.1.0.0
- Stock Accounts
- Stores
- Stock Resources
- Estates Management
- Rates Register
- Lease Register
- Rent Register
- Building Utilities
Available from 5.5.0.0
Locations are one of the system entities that can have Work & Access Surveys enabled in Table Catalog, in a similar way to enabling Hazard / Alert Types against an entity.
Once enabled against the Locations entity, a new sub navigation will become available in the System sub navigation group of the Locations input panel:
Contacts
Contacts can be assigned to Locations.
Facilities > Property and Estates > Location Register - Contacts
The link will open the Location Register / Contacts grid. It is a grid view which can be searched, sorted and customised as normal.
To assign Contacts click Assign ![]() , entities in the right hand assignment window are connected.
, entities in the right hand assignment window are connected.
To create Contacts see Contacts
Group Locations
Locations can be grouped together for Facilities Booking purposes, so if a Location has removable walls, multiple Locations can be booked out at once.
Note: To define Grouped Locations a minimum of three Locations must be created; one for each single room and one for the room combination
Example: Training Room 1, Training Room 2 and Training Room 1&2 , which is the Grouped Location. This means that Training Room 1 or 2 can be booked separately, but if Training Room 1&2 is booked it will add a booking in both Locations.
Facilities > Property and Estates > Location Register - Group Locations
The link will open the Location Register / Group Locations grid. It is a Grid view that can be customised and sorted as normal.
To assign Locations click Assign ![]() , entities in the right hand assignment window are connected.
, entities in the right hand assignment window are connected.
Inventory
Inventory can be allocated to a Location for Facilities Booking purposes. The Inventory must have been marked as either "fixed" or "fixed and floating" to be assigned to a Location.
Facilities > Property and Estates > Location Register - Inventory
The link will open the Location Register / Inventory grid. It is a grid view that can be customised and sorted as normal.
To assign Inventory click Assign ![]() , entities in the right hand assignment window are connected.
, entities in the right hand assignment window are connected.
To create Inventory see Inventory Items
Room Layouts
A room may have many different layouts available, e.g. Meeting room, Horse shoe, Cinema Style etc. Each of these layouts can have different Attendee limits, setup and closure times.
Once a booking has been made against a Location the Room Layout can be changed.
Facilities > Property and Estates > Location Register - Room Layouts
To add a new Room Layout click New ![]() , to edit an existing Room Layout click Edit
, to edit an existing Room Layout click Edit ![]() . A pop up window will appear which will allow the creation or amendment of a Room Layout.
. A pop up window will appear which will allow the creation or amendment of a Room Layout.
Click to view - Room Layout Fields and Descriptions
Departments
Locations can be linked to Departments.
Facilities > Property and Estates > Location Register - Departments
The link will open the Location Register / Departments grid. It is a grid view which can be searched, sorted and customised as normal.
To assign Departments click Assign ![]() , entities in the right hand assignment window are connected.
, entities in the right hand assignment window are connected.
To create Departments see Departments
Conseq Unavailable - Payment Mechanism module only
Consequential Unavailability is used to mark Locations as unavailable as a knock on effect of a fault in another Location. e.g. if no water is available in the kitchen the cafeteria will have to close. This is part of the Payment Mechanism Module
Facilities > Property and Estates > Location Register - Conseq Unavailable
The link will open the Location Register / Conseq Unavailable grid. It is a grid view that can be customised and sorted as normal.
To assign Locations click Assign ![]() , entities in the right hand assignment window are connected.
, entities in the right hand assignment window are connected.
Catering Exclusions - Facilities Booking Module only
Catering Menus are not always available for all Locations. If certain Catering is not available in this Location it can be excluded from either the Location or the Catering Menus entity.
Facilities > Property and Estates > Location Register - Catering Exclusions
The link will open the Location Register / Catering Exclusions grid. It is a grid view that can be customised and sorted as normal.
To assign Catering Exclusions click Assign![]() , entities in the right hand assignment window are connected.
, entities in the right hand assignment window are connected.
Floor Plan - Excitech module only
Available from 4.4.5
Excitech Layersets can be linked to a Location.
Facilities > Property and Estates > Location Register - Floor Plan
From the drop down select the Excitech Layerset. For more information see Excitech Settings
Occupants
The Occupants sub navigation contains a list of Contact records that have been marked as working or residing in the current Location.
Facilities > Property and Estates > Locations - Occupants
The link will open the Locations / Occupants grid. It is a grid view that can be customised and sorted as normal.
To add a new Occupant Contact to the current Location, click the New Contact![]() button to open the Contact input panel in new entry mode, enter the relevant details and save.
button to open the Contact input panel in new entry mode, enter the relevant details and save.
To mark an existing Contact as working or residing in the current Location, either of the following apply:
-
Open the relevant Contact record, navigate to the Employment tab and choose the Building for the current Location and the current Location in the Location field
-
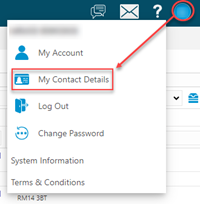
If the Contact record is linked to your User Account; Open the My Contact Details page and set/update the Building for the current Location and the current Location in the Location field:
Stock Accounts
Available from 5.7.0.0
Prior to version 5.7 of MRI Evolution, it was only possible to assign Stock Locations to Accounts via the Stock Locations sub-navigation in the Accounts input panel. It is now possible to assign Accounts to Stock Locations in the new Stock Accounts sub-navigation.
Available from 6.0.1.0
A new column Stock Issue Approver has been added to the grid as a default column. The column contains a checkbox and can be edited directly in the grid.
After assigning Account(s) to the Stock Location, check the checkbox to set the selected Account(s) as a Stock Issue Approver for Stock in the current Location.
Note: This sub navigation will only be displayed when the current Location has been defined as a Stock Location. I.e. when the Stock Location checkbox has been set.
Facilities > Property and Estates > Location Register - Stock Accounts
The link will open the Location Register / Stock Accounts grid. It is a grid view that can be customised and sorted as normal.
To assign Accounts click Assign![]() , entities in the right hand assignment window are connected.
, entities in the right hand assignment window are connected.
Stores
Available from 5.7.0.0
The Stores sub-navigation allows users to view and edit the Stock (FSTOCK) items that are linked to the current Stock Location.
Note: This sub navigation will only be displayed when the current Location has been defined as a Stock Location. I.e. when the Stock Location checkbox has been set.
Facilities > Property and Estates > Location Register - Stores
The link will open the Location Register / Stores grid. It is a grid view that can be customised and sorted as normal.
Stock Resources
Available from 5.8.1.0
The Stock Resources sub navigation contains a grid of Resources that have been assigned to the current Location. Only Resources with an Evolution Go account linked to them can be assigned.
The assignment of Resources to Stock Locations is used in Evolution Go activities as a short cut to quickly see the Stock levels in the Stock Locations associated with their Resource record.
Available from 6.0.1.0
The Stock Resources grid has by default, three editable columns; Default Location, Default Van Stock Location and Stock Issue Approver.
After assigning a Resource to the Stock Location, check the relevant checkbox(es) for the assigned Resource:
-
the current Location to be the default Stock Location for the selected Resource
-
the default Van Stock Location for the selected Resource
-
the selected Resource is a Stock Issue Approver for Stock in the current Location
A Resource cannot have more than one Default Stock Location or Default Van Stock Location.
Note: The sub navigation will not be displayed unless: both Stock and Evolution Go are licenced and the current Location has been defined as a Stock Location.
Facilities > Location - Stock Resources
The link will open the Resource Stock Locations grid. It is a grid view that can be customised and sorted as normal.
To assign Resources to Stock Locations, click Assign ![]() , entities in the right hand assignment window are connected.
, entities in the right hand assignment window are connected.
Estates Management
If using the Estates Management Module Rent, Lease and Rates Registers can be linked to a Location, and Locations Utilities can be recorded.
For more information see: