Advanced Helpdesk - Calendar
Available from 6.0.1.0
The Calendar sub navigation contains an 'Outlook-like' calender representation of the activities and entities associated with the current Task, displayed as coloured blocks of time.
Actions can be carried out directly from the Calendar sub navigation, such as:
-
Adding Task Events to the current Task
-
Assigning Resource(s) to the current Task
-
Opening the Resource Planner, passing the current Task's Id to filter the planner
-
Finding the nearest Resource to the current Task's geographic location
Task Management > Advanced Helpdesk - Calendar
The link will open the Calendar plan sub navigation. The default View will be Week and the date values relevant for the current date will be displayed.
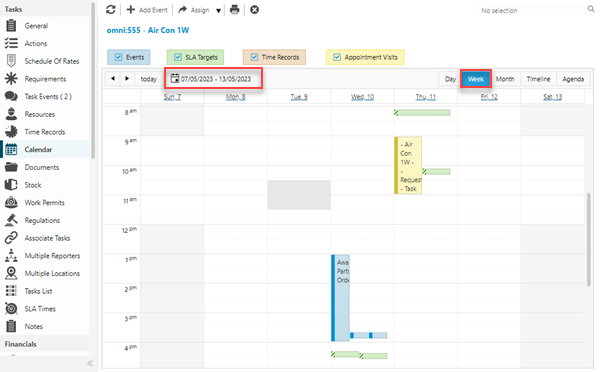
Filters
The Calendar plan can be filtered to display or hide the following entities related to the current Task:


Tick or untick the relevant checkbox to display or hide the corresponding entities.
Coloured Entity Objects In The Planner
Events
Event objects:
-
are coloured blue in the planner
-
can be added by clicking the toolbar button
-
can be added within the planner itself by highlighting an area of the planner and right clicking, select New Event from the context menu
-
the Event Type will default to Planned, the Planned Date will be set using the highlighted area of the planner
-
-
can be created outside of the planner in the normal way
-
have a left side coloured indicator bar with the following types:
-
 a solid blue bar for Events with an Event Type of Actual or Events with an Event Type of Planned that have been marked as Actioned
 -
 a striped blue bar for Planned Events that have not been marked as Actioned
-
-
can be edited from the planner by:
-
double clicking on the object, a popup will be displayed containing a hyperlink to the Event input panel, allowing users to edit the Event record
-
right clicking on the object, select Open from the context menu to open the Event input panel
-
-
have the option to open a pop up window that displays 'pins' that equate to the Latitude and Longitude GPS co-ordinates of the Evolution Go Resources assigned to the current Task, right click on the object and select View Map in the context menu
-
with an Event Type of Planned:
-
can be resized in the planner by dragging and dropping the resize indicator shown at the top and bottom of the object
-
can be moved in the planner by dragging and dropping the object itself
-
SLA Targets
SLA Target objects:
-
are coloured green in the planner
-
are automatically populated in the planner based upon the SLA Editor values relevant to the current Task
-
have a left side coloured indicator bar with the following types:
-
 a solid green bar to indicate the SLA Target has been met
 -
 a striped green bar to indicate the SLA Target has not been met
-
-
can be viewed by double clicking on the object, a popup will be displayed containing details of the SLA Target date
Time Records
Time Record objects:
-
are coloured orange in the planner
-
can be added by clicking the toolbar button
-
can be added within the planner itself by highlighting an area of the planner and right clicking, select Assign Resource from the context menu
-
The Time Record Start Time will be based upon the highlighted area of the planner
-
-
can be created outside of the planner in the normal way
-
have a left side coloured indicator bar with the following types:
-
 a striped orange bar to indicate the Time Record has not been Started
 -
 a solid orange bar to indicate the Time Record has been Started but not Finished
 -
No side bar shown to indicate the Time Record is Finished
-
-
can be edited directly from the planner by double clicking on the object or right clicking and selecting Edit from the context menu
-
a popup will be displayed, allowing users to edit certain details of the Time Record:
-
Details - read only field, label is a hyperlink to open the full Time Record input panel
-
Resource - read only field, label is a hyperlink to open the Resource input panel
-
Scheduled Start
-
Estimated Time
-
Estimated Travel Time
-
Date Started
-
Date Finished
-
Status
-
-
-
for a Time Record that has not yet been started:
-
can be resized in the planner by dragging and dropping the resize indicator shown at the top and bottom of the object
-
can be moved in the planner by dragging and dropping the object itself
-
-
will display a padlock icon for Time Records that have been 'locked'

Appointment Visits
Appointment Visit objects:
-
are coloured yellow in the planner
-
are created outside of the planner in the normal way
-
have a left side coloured indicator bar with the following types:
-
 a striped yellow bar to indicate the Appointment has a Provisional status
 -
 a yellow outline to indicate the Appointment has a Cancelled status
 -
 a solid orange bar to indicate the Appointment has any other status
-
-
can be edited directly from the planner by double clicking on the object or right clicking and selecting Edit from the context menu
-
a popup will be displayed, allowing users to edit certain details of the Appointment Visit:
-
Details - read only field, label is a hyperlink to open the full Appointment Visit input panel
-
Contact
-
Request
-
Appointment Type
-
Arrival Window Start
-
Arrival Window End
-
Status
-
-
-
for a Provisional Appointment Visit:
-
can be resized in the planner by dragging and dropping the resize indicator shown at the top and bottom of the object

-
can be moved in the planner by dragging and dropping the object itself
-
Planner Views
The Calendar plan can be changed to display the following views:
Day
-
Only one day will be displayed in the plan
-
The Calendar plan displays hour (and fainter half hour) row grid lines for 24 hours, with the time relative to the rows displayed to the side
-
The displayed day can be changed by clicking the
 forward and backward arrows, or selecting a specific date via the
  date picker
 -
The
 button is a short cut to change the current View of the Calendar plan to be relevant to the current date
Week
-
The current week will be displayed by default
-
The Calendar plan displays hour (and fainter half hour) row grid lines for 24 hours, with the time relative to the rows displayed to the side
-
The days of the week will be displayed as columns, each column header has a date that's a hyperlink
-
Clicking on a column header hyperlink will change the Calendar plan to a Day view and display the details for the selected date
-
The displayed week can be changed by clicking the
forward and backward arrows, or selecting a specific date via the date picker, the week containing the selected date will be displayed -
The
button is a short cut to change the current View of the Calendar plan to be relevant to the current date
Month
-
The current month will be displayed by default
-
The Calendar plan displays a grid of square boxes, each box has a number denoting the day in the month, the number is a hyperlink
-
Clicking on a box date hyperlink will change the Calendar plan to a Day view and display the details for the selected date
-
The displayed month can be changed by clicking the
forward and backward arrows, or selecting a specific date via the  date picker, the month containing the selected date will be displayed
 -
The
button is a short cut to change the current View of the Calendar plan to be relevant to the current date
Timeline
-
The current week will be displayed by default, with the current day being first followed by the next six days
-
The Calendar plan displays a linear representation of the week ahead
-
The displayed week can be changed by clicking the
forward and backward arrows, or selecting a specific date via the date picker, the week containing the selected date will be displayed -
The
button is a short cut to change the current View of the Calendar plan to be relevant to the current date
Agenda
-
The current week will be displayed by default, with the current day being first followed by the next six days
-
The Calendar plan displays a vertical linear representation of the week ahead
-
Clicking on a box date hyperlink will change the Calendar plan to a Day view and display the details for the selected date
-
The displayed week can be changed by clicking the
forward and backward arrows, or selecting a specific date via the date picker, the week containing the selected date will be displayed -
The
button is a short cut to change the current View of the Calendar plan to be relevant to the current date
Icons
| Icon | Feature | Description |
|---|---|---|
|
|
Add Event | Click to open the Task Event page and add an Event to the current Task. |
| Assign Button Group |
The buttons in the 'Assign Button Group' will be greyed out and unavailable if the Task Status is one of the following:
|
|
|
|
Assign Resource |
Click to assign a Resource to the current Task. |
|
|
Open Planner |
Click to open the Resource Planner. |
|
|
Find Nearest Resource | Click to open a pop up window containing a map view of the nearest Resources. The Task's Building location is shown with a red pin, the Resource(s) location(s) are shown with Blue pins. |
|
|
Task Calendar Report | Click to run the new report for Task Calendar - CA-TA001. |