SLA Editor
The SLA Editor allows a User to build a specific SLA matrix (Service Level Agreements) for their Business.
The SLA Matrix will start at the top of the matrix and work its way down until a match is found, once a match for the Task is found, the relevant SLA values will be calculated and added to the Task.
Up to 5 different SLA Targets can be set for Tasks:
|
Target |
Description | Intended Audience | Met by |
|---|---|---|---|
| Respond | Date and time that a helpdesk operative or despatcher should assign the Task to a Resource | Helpdesk/Despatch Team | Earliest Date Contacted on assigned Time Records |
| Attend | Date and time that an assigned Resource should attend site to investigate the Task | Assigned Resource | Earliest Date Started on assigned Time Records |
| Contain | Date and time that an assigned Resource should implement a temporary fix to contain the issue and make it safe | Assigned Resource | Earliest Date Contained on assigned Time Records |
| Fix | Date and time that assigned Resources should record that they have finished work on the Task and the Task is complete | Assigned Resource | Latest Date Finished on assigned Time Records |
| User | A spare SLA Target that can be set and met according to your requirements | Variable | Entered manually in the User field of the SLA Times sub-navigation page in the Advanced Helpdesk |
Modules > SLA Editor
The link will open the SLA window.
Available from 6.2.0.0
The usability of the SLA Editor has been improved as follows:
-
The three window components can be re-sized by users, the re-sized windows are persisted
-
The Toolbar has been updated as follows:
-
Text labels have been added to the toolbar buttons
-
The toolbar buttons have been re-organised in order to make them consistent with other areas of MRI Evolution
-
New toolbar buttons for Expand All and Collapse All nodes in the SLA Matrix tree
-
New toolbar button to launch the new SLA Matrix SLA-MT001 report
-
A number field has been added to the toolbar between the Previous Page and Next Page buttons. Users can enter a number in this box to jump straight to the selected page number. The control works in a similar way to the page number box in the footer of Grids
-
-
Performance issues related to changing pages and saving have been resolved
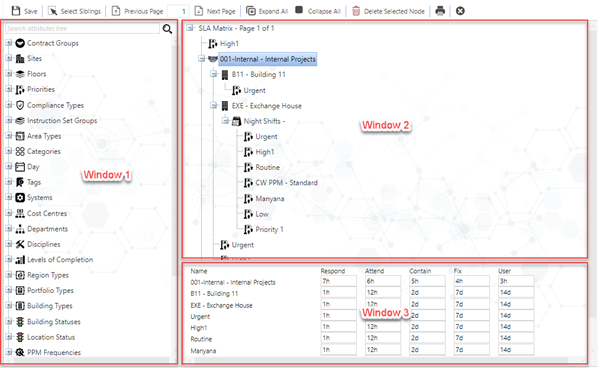
Components Menu - Window 1
Components
Components menus can be expanded and collapsed to display entities
Searching for Components
At the top of the Components Menu there is an input box that can be used to find specific values for systems that have large quantities of data.
Adding Components - Window 2
Adding Components
Left click and hold your entity. Drag it onto the right hand side over the value SLA Matrix
When the value SLA Matrix is underlined release the mouse button
Your entity will appear in the matrix
From the components menu click the Siblings button, all the entities will now be selected and can be dragged into the matrix
Removing Entries from the SLA Matrix
If values have been entered by mistake or in the wrong place then they will need to be removed. This can be done by highlighting the node and clicking Delete ![]() .
.
Entering SLA time Values - Window 3
Below the Matrix tree is the SLA Times pane. Selecting a value in the SLA Matrix will display an entry box for that node and those immediately below it.
Time values can be entered using the following convention, where {x} is a whole number:
{x}m - Minutes
{x}h – Hours
{x}d – Days
{x}w – Weeks
{x}m – Months
{x}y – Years
{x}cd - Calendar Days
{x}cw - Calendar Weeks
{x}cm - Calendar Months
{x}cy - Calendar Years
{x}p = Periods
{x}eow - End of Week Available from 5.7.0.0
{x}eom - End of Month Available from 5.7.0.0
Note: For the End of Month and End of Week time values, the {x} number can be 0 (you can have 0EOW and 0EOM) which will produce targets at the end of the same week or month as the TA_DUE_DATE of the Task.