Assets
An Asset is a piece of equipment or kit that needs to be maintained. Every Asset to be tracked and maintained through MRI Evolution must be defined in the database.
The list of Assets is maintained here.
Facilities > Assets
The link will open the Asset grid. It is a grid view which can be searched, sorted and customised as normal.
Note: To review Historic Assets check the Show historic Assets Box.
To add a new Asset click New ![]() , to edit an existing Asset click Edit
, to edit an existing Asset click Edit ![]() . A pop up window will appear which will allow the creation or amendment of an Asset.
. A pop up window will appear which will allow the creation or amendment of an Asset.
Note: In version 4.7 onwards the order of the Asset fields was altered and the spatial tab was added
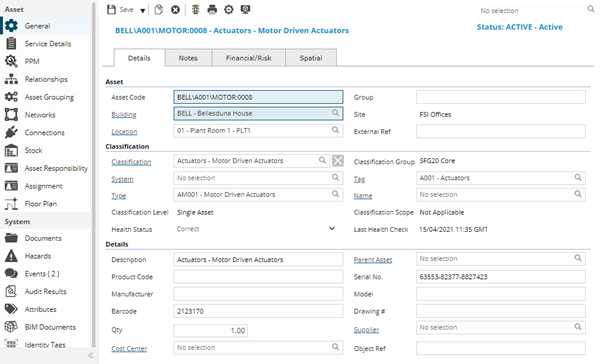
 Click to view - Asset Details Fields and Descriptions
Click to view - Notes Tab Fields and Descriptions
Click to view - Financial / Risk Tab Fields and Descriptions
Click to view Spatial Fields and Descriptions
Complete the fields and click Save ![]() . Once the Asset header has been completed and saved, sub navigations will appear to allow additional entities to be assigned.
. Once the Asset header has been completed and saved, sub navigations will appear to allow additional entities to be assigned.
These include:
- Service Details
- PPM
- Relationships
- Asset Grouping
- Networks
- Connections
- Stock
- Asset Responsibility
- Assignment
- Floor Plan
Additional Icons
| Additional Icons | Feature | Description |
|---|---|---|
|
|
Asset Status |
An Asset Status can be changed from the default Status. Click the icon to open a popup, from the drop down select the required Asset Status, optionally enter a comment to support the Status change. |
|
|
Run Health Check for Selected Assets |
Available from 4.7.0.0 Click to run a health check against the current Asset according to the Asset's Classification |
|
|
View Asset BIM Document |
Available from 4.6.0.0 Click to open the default BIM document associated with the current Asset in a pop up window. |
Service Details
The service history of works (Tasks) completed against the current Asset as well as Assets related to the current Asset can be viewed from this screen.
Facilities > Assets - Service Details
The link will open the Asset / Service Detail grid. It is a grid view that can be customised and sorted as normal.
The upper half of the page displays the current Asset and where it fits in a hierarchy of Parent / Child or related Assets.
The lower half contains a grid of Tasks. The Tasks displayed will depend upon the query selected in the drop down. Options are as follows:
- Tasks directly against asset or via task action for asset
- Tasks against all parent assets
- Tasks against all sub-assets
- Tasks against all parent and sub-assets
If the Asset has Parent, Child, Connected or Sub - Assets, their service history can also be seen from this grid by selecting the required query from the drop down.
If the Child or Sub - Assets have had Actions these can be seen as Task Actions in the Association column.
Click the ![]() button to run the GL-MT002 General Listing of Maintenance for Asset report.
button to run the GL-MT002 General Listing of Maintenance for Asset report.
PPM
Some Assets have a Planned Preventative Maintenance (PPM) schedule to ensure they are kept in good working condition. The dormant schedule can be viewed, created and edited here.
Facilities > Assets - PPM
The link will open the Asset / PPM grid. It is a grid view that can be customised and sorted as normal.
To create a PPM see PPM Overview
Relationships
Assets can be placed in Parent and Child relationships to maintain connections and a hierarchy between Assets.
Facilities > Assets - Relationships
The link will open the Asset Relationship window.
To add a Parent Asset click Set Parent Asset ![]() . The icon will open an Asset grid, highlight the required Asset and click Associate selected Asset as the Parent Asset
. The icon will open an Asset grid, highlight the required Asset and click Associate selected Asset as the Parent Asset ![]() .
.
To add Child Assets click Add / Remove Child Assets ![]() , Child Assets are assigned. To assign Child Assets click Assign
, Child Assets are assigned. To assign Child Assets click Assign![]() , entities in the right hand assignment window are connected.
, entities in the right hand assignment window are connected.
Asset Grouping
Available from 4.4.6 An Asset can be linked to many other Assets. This can be recorded in MRI Evolution via Asset Grouping.
Facilities > Assets - Asset Grouping
The link will open the Asset Grouping screen. It is a two grid screen which can be searched and customised as normal.
The upper grid will show any Assets the current Asset belongs to, the lower grid will show any Sub - Assets connected to the current Asset.
Assets can be connected to other Assets by clicking Select the Asset this Asset belongs to ![]() . A pop up window will open that will allow the assignment of connecting Assets. To assign Assets click Assign
. A pop up window will open that will allow the assignment of connecting Assets. To assign Assets click Assign ![]() , entities in the right hand assignment window are connected.
, entities in the right hand assignment window are connected.
Sub Assets can be added and removed by clicking Select the Sub- Assets assigned to this Asset ![]() , To assign Sub - Assets click Assign
, To assign Sub - Assets click Assign![]() , entities in the right hand assignment window are connected.
, entities in the right hand assignment window are connected.
Networks
Available from 4.4.6 Asset Networks allow a User to identify the networks an Asset belongs to e.g. the mains water supply may feed the HWS, CWS and drinking water supply.
Facilities > Assets - Networks
The link will open the Assets / Networks grid. It is a grid view that can be customised and sorted as normal.
To assign Networks click Assign![]() , entities in the right hand assignment window are connected.
, entities in the right hand assignment window are connected.
To create Networks see Asset Networks
Connections
Available from 4.4.6. Connection Types are used to define connections between Assets e.g. supply, data, flow or structural connections.
Facilities > Assets - Connections
The link will open the Assets / Connections grid. It is a grid view which can be searched, sorted and customised as normal.
To add a new Connection click New ![]() , to edit an existing Connection click Edit
, to edit an existing Connection click Edit ![]() . A pop up window will appear which will allow the creation or amendment of a Connection.
. A pop up window will appear which will allow the creation or amendment of a Connection.
Click to view - Connection Fields and Descriptions
Stock - Stock Module only
Assets may require certain parts or Stock. A list of the required parts can be recorded here.
Facilities > Assets - Stock
To add a new Stock Part click New ![]() , to edit an existing Stock part click Edit
, to edit an existing Stock part click Edit ![]() .
.
Click to view - Asset Stock Fields and Descriptions
Complete the fields and click Save and Close ![]() .
.
To create Stock see Stores
Asset Responsibility
An Asset may be monitored, maintained or owned by a person, this information can be stored against the Asset using Asset Responsibility by assigning Contacts to an Asset.
Facilities > Assets - Asset Responsibility
To assign Contacts click Assign ![]() , entities in the right hand assignment window are connected.
, entities in the right hand assignment window are connected.
To create Contacts see Contacts
Assignment
If a Asset has been assigned to a Contact, the details can be viewed here.
Facilities > Assets - Assignment
To assign an Asset to a Contact see Contacts.
Floor Plan - Excitech module only
To link an Asset to an Excitech Layerset
Facilities > Assets - Floor Plan
From the drop down select the Excitech Layerset.
Additional Asset Grid Icons
| Icon | Feature | Description |
|---|---|---|
|
|
Asset Status | Change the status of the selected Asset(s) |
|
|
Run Health check for selected Assets |
Available from 4.7.0.0 Select Asset /s from the grid and click to run a health check according to the Assets Classification |
|
|
Health Check Report |
Available from 4.7.0.0 Click to run a comprehensive health check report for all Assets in the Asset Register |
|
|
Health Check Status Legend |
Available from 4.7.0.0 Click to see the legend that explains the meaning of each Health Check Status |
|
|
Assign Asset Classification |
Available from 4.7.0.0 Select Asset(s) from the grid and click to assign an Asset Classification. Note this could change the Assets System, Tag, Type and Name |
|
|
Asset Detail Report | Click to run the GL-DT001 Asset Detail Report report. |
|
|
Asset Health Check Quick Fix |
Available from 4.7.0.0 Select one or more Assets from the grid, click and check the required radio buttons to
|