Resource Planner
The Resource Planner shows which Resources are available, what Tasks they have scheduled and how much time they have available on any given day. It is used to assign and manage Tasks.
Task Management > Resource Planner
The link will open the Resource Planner window, it is a window that can be filtered to show Resources availability and be used to assign and manage Tasks.

 Click to view - Resource Planner Icons
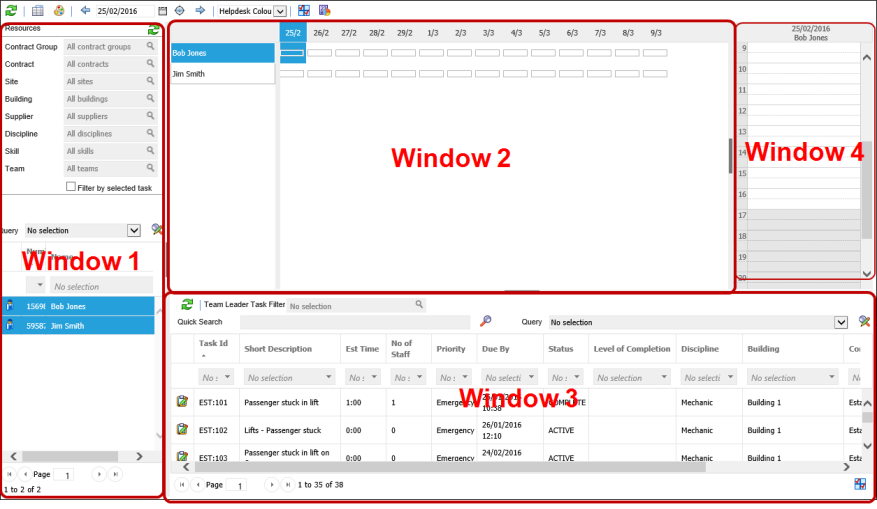
Resource Planner Windows
Window 1 enables a User to select the Resources for the diary view, the filters in the top of the window will filter the available list of Resources in the bottom window.
Note: There are three Refresh icons on the Planner. The refresh in top left of the Planner refreshes the whole Planner. The refresh in the Top right of the Resource filters refreshes the list of Resources. The refresh to the top right of the Task Grid refreshes the Tasks.
From the drop downs select the Resource filters, click Refresh ![]() - located to the top right of the Resource filters
- located to the top right of the Resource filters
Highlight the Resources required for planner build.
To build the Planner click Refresh ![]() - located to the top left of the Planner.
- located to the top left of the Planner.
Window 2 enables the diary overview.
Clicking on a date will show Resources daily diary’s side by side.
Clicking on a Resources name will show just that Resources dairy for the coming days.
Resources availability is shown as white if they are available and grey if they should not be available. - Rotas or Resource Planner Preferences must be in place for this colouration to show, Resources can be assigned work in greyed out areas as this is purely an indication that the Resource may not be available.
Window 3 is a Task grid. It is a grid view which can be searched, sorted and customised as normal.
Window 4 enables a quick overview of a Resources Diary for a single day. Click on the day within Window 2 to view.
Assigning Tasks
Tasks can be assigned by dragging them from the Task grid on the appropriate slot in a Resources Diary. Right clicking on the Task once it is in the Planner provides the following options
- Delete this entry - deletes the diary entry and associated Time Record
- Edit this entry - allows the scheduled start and estimated times of Task to be manually altered - this can also be done by dragging the Task to increase or decrease the size of the Task bubble
- Cut - Cut the Time Record out of a Resources Diary and allow it to be pasted to another Resources Diary.
- Copy - Copy the Time Record out of a Resources Diary and allow it to be pasted to another Resources Diary.
- Lock this entry - Prevents the Task being moved in the diary until it is unlocked.
- Show editing window - opens the Resources Time Record for the Task.
- Open task window - opens the Advanced Helpdesk.
Adding Note and Absences
There are times when Resources time is taken up other than travel or Tasks. These can be documented as Absence or with a Note.
In the Calender view left click and drag to highlight a period of time
Release the mouse button, a pop up window will appear allowing details of the Note of Absence to be entered.