Widget - Helpdesk
Helpdesk widgets can be created to allow Evolution Reach Users to easily log calls. Many Helpdesk widgets can be created to allow different Users to have a relevant Helpdesk.
Settings > Widget Setup > Widgets
The link will open the Widgets grid. It is a grid view which can be searched, sorted and customised as normal.
To add a new Widget click New ![]() , to edit an existing Widget click Edit
, to edit an existing Widget click Edit ![]() . A pop up window will appear which will allow the creation or amendment of a Widget.
. A pop up window will appear which will allow the creation or amendment of a Widget.
Select the Widget template : Helpdesk. Complete the fields and click Save ![]() . Click Configure Widget
. Click Configure Widget ![]() .
.
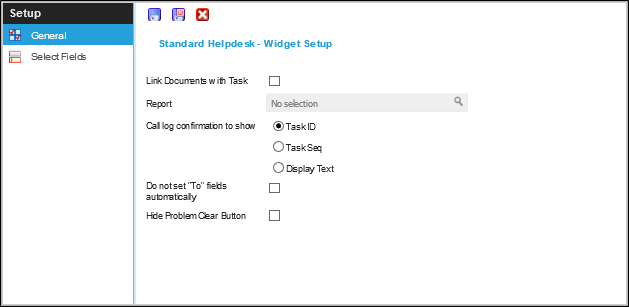
 Click to view - Widget Set up Fields and Descriptions
Complete the fields and click Save ![]() . Fields can now be assigned to the Helpdesk via the sub navigation Select Fields
. Fields can now be assigned to the Helpdesk via the sub navigation Select Fields
Select Fields
Select fields allows the User to define which fields a Evolution Reach User will be able to see and if any of them have default information
Settings > Widget Setup > Widgets - Select Fields
The link will open the Select Fields grid. It is a grid view that can be customised and sorted as normal.
To assign Fields click Assign ![]() , entities in the right hand assignment window are connected.
, entities in the right hand assignment window are connected.
The order of the Fields can be adjusted using Move Up ![]() and Move Down
and Move Down ![]() .
.
Once Fields have been assigned the Fields Setup can be configured. Double click the field to configure.

Click to view - Fields Set Up Fields and Descriptions
Exclusions
Values can be excluded from the Helpdesk, these excluded values need to be assigned via sub navigation Exclusions.
Settings > Widget Setup > Widgets - Select Fields - Exclusions
The link will open the Exclusions grid. It is a grid view that can be customised and sorted as normal.
To assign Exclusions click Assign ![]() , entities in the right hand assignment window are connected.
, entities in the right hand assignment window are connected.
Complete the fields and click Save and Close ![]() .
.
Note: If Excitech is licenced and a Location has been added to the Widget, a hyper link to the floor plan will be seen in the Widget under Location.