Integrated Services
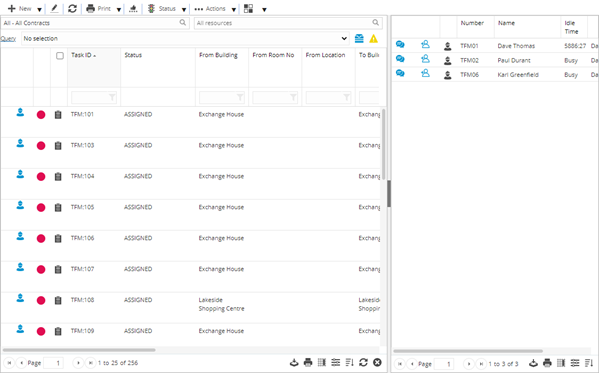
The Integrated Services grid presents a view of both current Tasks and the Resources available to perform those Tasks. Resources can be assigned Tasks by dragging and dropping the Task onto the Resource.
Task Management > Integrated Services
The link will open the Integrated Services window.
- To assign a Task select it in the left hand grid and drag and drop it over the Resource in the right hand grid – multiple Tasks can be dragged at a time.
- Double clicking a Task will open a pop up window to the Advanced Helpdesk.
- Once the Integrated Services window is open, you can choose to hide or unhide the Resource Grid by clicking on the dark grey part of the screen split.
Available from 5.7.0.0
The right hand Resource pane has been updated as follows:
- The default size has been changed from a fixed width of 316 pixels to 35% of the page size
-
The pane can now be resized as well as collapsed
Resource Grid
- The note pad next to the Resource names indicates that they have been allocated some Tasks. Clicking on the notepad will open a list with default information about the Tasks. This list can be modified in the User Preferences.
- The number of jobs assigned to the resource is indicated at the top of the notepad.
- The Idle time shows the time since the Resource finished their last Task or the last time they logged in, whichever is greater.
- Once an engineer is assigned a Task and the Time Record start time is entered the word Busy will be displayed.
ISM Task Features
Pausing a Task
Once the Integrated Services window is open, a Task can be Paused. Tasks may be paused due to various reasons. Based on User Preferences and setup a User may be asked to add a mitigating reason and comment when a Task is Paused.
Restart a Task
A Task can restarted by clicking on the Restart button within the Integrated Services Grid or in the Helpdesk.
Cancel a Task
A Task can be cancelled. If User Preferences are set to Force Mitigating reasons, the User will have to provide a reason for cancelling the Task.
Create Return Route Task
A return route Task will create a new Task with the to and from Locations switched.
Quick Entry Helpdesk
Within the Integrated Services window a Task can be added using the Quick entry functionality. A Resource can be added when the Task is created, the Task will automatically be assigned and a Time Record will be created on Save.
Additional Icons
| Icon | Feature | Description |
|---|---|---|
| Toolbar button group - Print | ||
|
|
Job card | Print a job card for the selected Tasks. |
|
|
Batch job card | Print job cards in batch for the selected Tasks. |
| Toolbar button group - None | ||
|
|
Assign CSF to Task | Assign a customer satisfaction form to the selected Tasks. |
| Toolbar button group - Status | ||
|
|
Pause | Places the selected Tasks on pause. Users may need to provide a mitigating reason depending on set up. |
|
|
Restart | Restart the selected Tasks if they were paused. |
|
|
Mark as Complete | Mark the selected Tasks as Complete. |
|
|
Cancel | Cancel the selected Tasks. If User Preferences are set to Force Mitigating reasons, a User will have to provide a reason for cancelling the Task. |
|
|
Sign-Off to History | Sign off the selected Tasks to History. |
|
|
Restore Task |
Available from 5.5.0.0 Click to restore Task / s to the State they were prior to being sent to History or Cancelled. |
| Toolbar button group - Actions | ||
|
|
Bulk Copy | Create a new Task by copying the selected Task. |
|
|
Create Return Route Task | This will create a new Task for each of the selected Tasks, with the to and from Locations switched. |
|
|
Toggle Task Lock Status | Adjust the Task Lock for selected Tasks. |
|
|
Engineer Start / Finish | Opens the Advanced Helpdesk on the Resource sub navigation. |
|
|
Extra mitigating reasons | This button is only available if it is enabled in User Preferences. It allows a User to enter extra mitigating reasons for a Task. |
| Toolbar button group - Settings | ||
|
|
Open resource on / off duty page | Opens the Resource On / Off Duty Grid. |
|
|
ISM user preferences | Open ISM User Preferences. |
Resource On / Off Duty
Radios need to be assigned to Resources who will then be marked as ‘On duty’ or ‘Off duty’ when they turn the radios on or off.
If Radios are not in use, the Resource will need to be marked On / Off Duty manually.
Task Management > Integrated Services - Open resource on / off duty page
Highlight the Resource and click the relevant icon for action:
- Mark selection on duty
 - the Resource will be marked as on duty and will show up on Integrated Services grid.
 - Mark selection off duty
 -the Resource will be marked as off duty and will not show in up in Integrated Services grid.
 - Assign Radio to selected Resource
 - Assign a radio to selected Resource
 - Unassign Radio from selected Resources
 - Unassign radio from selected Resource to enable the radio to be assigned to a new Resource.
 - Reset Radios of selected Resources
 - Sends a reset signal to the selected radio.